
Preface
Redis is a NoSQL storage system. It lives in memory in a key-value form, so its performance is extremely high. It provides a lot of data structures and multi-language APIs, so there are tons of ways to play with it and implement all kinds of features and requirements. But right now, what I’ve actually touched in real projects is still pretty limited. So I’ve been watching videos on Bilibili to learn more of its capabilities, hoping that one day I can bring them into my own projects.
This post will keep getting updated with my learning notes. The video source is the Bilibili course in Reference 1. The instructor’s PPT is really well done—concise, to the point, and surprisingly comprehensive. Highly recommended.
Because there’s too much content, I split my Redis notes into two parts. In the first part, I learned some commonly used Redis commands, the most basic data structures Redis provides, plus persistence and transactions. Along the way I also read some articles by experts and realized each data structure can be “played” in so many ways—for example, you can even use a list as a message queue. Honestly, I’m a bit ashamed that in day-to-day project work I rarely stop to think carefully about how choosing different Redis data structures impacts the business. Below is the second part of my notes, and I’ll keep organizing and updating what I learn each day.
6. Deletion Strategies
1. Data Deletion Strategies
- Scheduled deletion
- Lazy deletion
- Periodic deletion
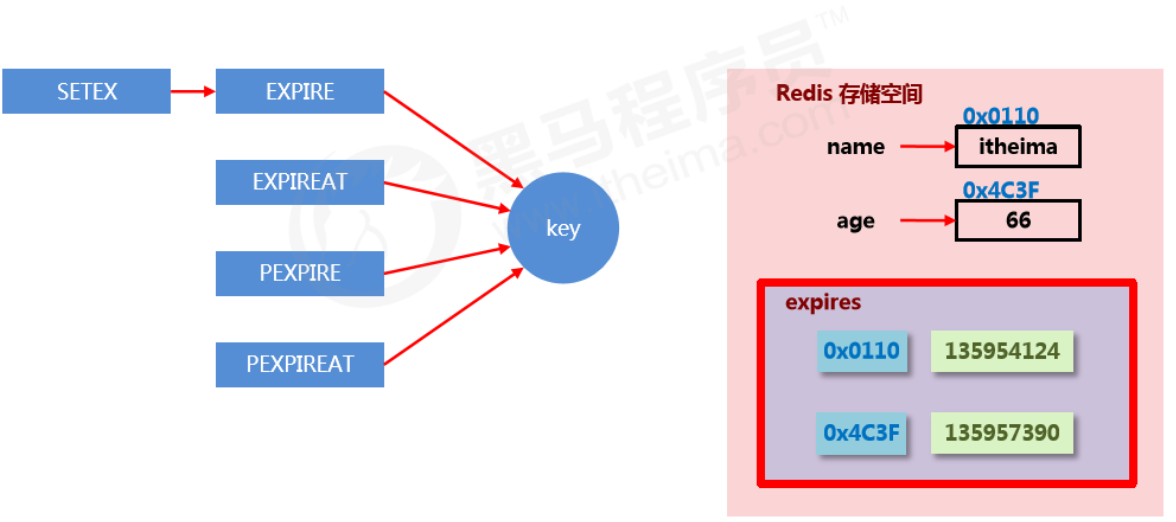
Storage structure for expiring data
- In Redis, expiring data is stored in
expirein a hash-like structure. The value is the data’s address in memory, and the field is the corresponding TTL (lifecycle).
Goal of data deletion strategies
Find a balance between memory usage and CPU usage. Over-optimizing one at the expense of the other will reduce overall Redis performance, and can even cause server crashes or memory leaks.
2. Three deletion strategies
Scheduled deletion
- Create a timer. When a key has an expiration time set and the expiration time is reached, the timer task immediately executes the key deletion.
- Pros: saves memory—delete right on time and quickly free unnecessary memory.
- Cons: high CPU pressure—no matter how high the CPU load is, it still consumes CPU, affecting Redis response time and command throughput.
- Summary: trade CPU performance for storage space (trade time for space).
Lazy deletion
- When data reaches its expiration time, do nothing. Wait until the next time the data is accessed:
- If not expired, return the data.
- If expired, delete it and return “does not exist”.
- Pros: saves CPU performance—only delete when it must be deleted.
- Cons: high memory pressure—some data may occupy memory for a long time.
- Summary: trade storage space for CPU performance (trade space for time).
Periodic deletion
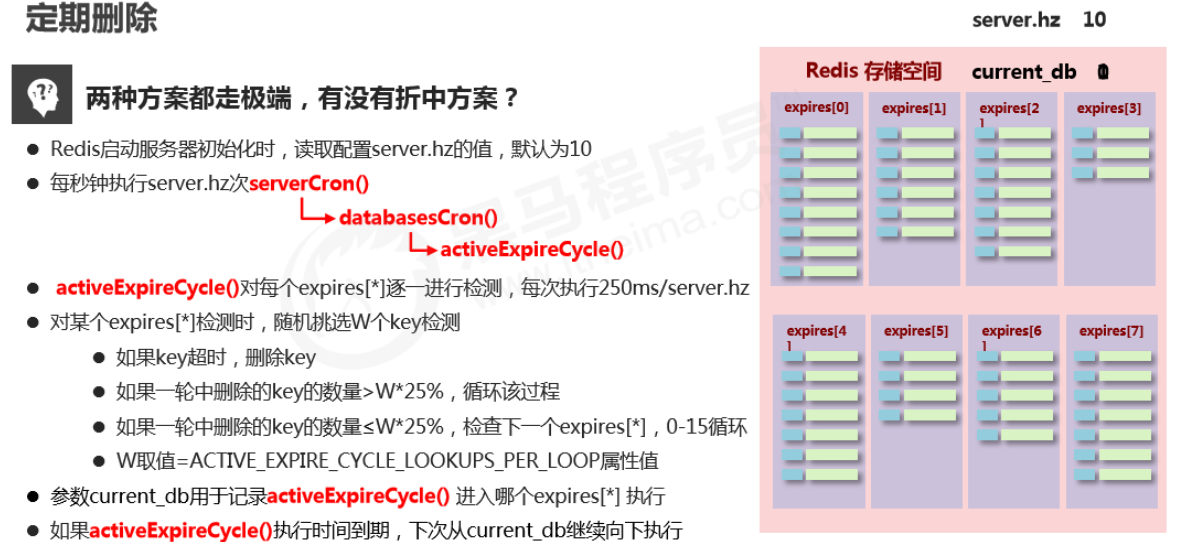
- Periodically poll expiring data in Redis databases. Use a random sampling strategy, and control deletion frequency based on the proportion of expired data.
- Feature 1: CPU usage has a peak limit; the check frequency can be customized.
- Feature 2: memory pressure isn’t too high; cold data occupying memory long-term will be continuously cleaned up.
- Summary: periodic spot-checking of storage (random sampling, focused sampling).
3. Eviction Algorithms
**When new data enters Redis, what if there isn’t enough memory? **
- Redis stores data in memory. Before executing each command, it calls freeMemoryIfNeeded() to check whether there is enough memory. If memory doesn’t meet the minimum storage requirement for the new data, Redis temporarily deletes some data to free space for the current command. This cleanup strategy is called an eviction algorithm.
- Note: the eviction process cannot guarantee 100% that it will free enough usable memory. If it fails, it repeats. After trying all data, if it still can’t meet the memory cleanup requirement, an error will be returned.
Related configurations affecting eviction
-
Maximum usable memory
maxmemoryCopyThe proportion of physical memory to use. Default is 0, meaning unlimited. In production, set it based on requirements—usually above 50%.
-
Number of candidates sampled each time
maxmemory-samplesCopyRedis won’t scan the entire database when selecting data to delete, because that would cause severe performance overhead and reduce read/write performance. So it uses random sampling to pick candidates for checking/deletion.
-
Eviction policy
maxmemory-policyCopyThe policy used to delete selected data after reaching the max memory limit.
Related configurations affecting eviction
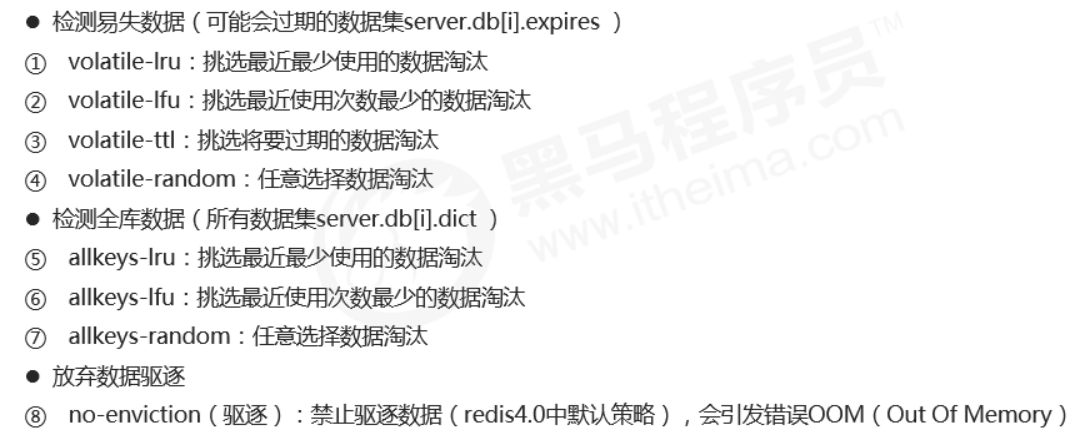
LRU: data that hasn’t been used for the longest time
LFU: data used the least number of times within a period
How to choose an eviction policy
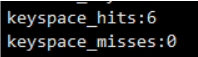
- Use the INFO command to output monitoring information, check cache hit and miss counts, and tune Redis configuration based on business needs.
7. Advanced Data Types
1. Bitmaps
Basic operations
-
Get the bit value at the specified offset for a key
getbit key offsetCopy -
Set the bit value at the specified offset for a key; value can only be 1 or 0
setbit key offset valueCopy
Extended operations
-
Perform bitwise AND/OR/NOT/XOR on specified keys and store the result in destKey
bitop op destKey key1 [key2...]Copy- and: intersection
- or: union
- not: negation
- xor: XOR
-
Count the number of 1s in a key
bitcount key [start end]Copy
2. HyperLogLog
Cardinality
- Cardinality is the number of distinct elements after deduplication in a dataset.
- HyperLogLog is used for cardinality counting and uses the LogLog algorithm.

Basic operations
-
Add data
pfadd key element1, element2...Copy -
Count data
pfcount key1 key2....Copy -
Merge data
pfmerge destkey sourcekey [sourcekey...]Copy
Notes
- Used for cardinality statistics. Not a set, does not store data—it records only the count, not the actual elements.
- The core is a cardinality estimation algorithm, so the final value has some error.
- Error range: the estimated result is an approximation with a standard error of 0.81%.
- Very small memory footprint: each HyperLogLog key uses 12K of memory to mark cardinality.
- The
pfaddcommand does not allocate 12K at once; memory gradually increases as cardinality grows. - After
pfmerge, the storage space used is 12K, regardless of how much data existed before merging.
3. GEO
Basic operations
-
Add coordinate points
geoadd key longitude latitude member [longitude latitude member ...] georadius key longitude latitude radius m|km|ft|mi [withcoord] [withdist] [withhash] [count count]Copy -
Get coordinate points
geopos key member [member ...] georadiusbymember key member radius m|km|ft|mi [withcoord] [withdist] [withhash] [count count]Copy -
Calculate distance between coordinate points
geodist key member1 member2 [unit]
geohash key member [member ...]Copy
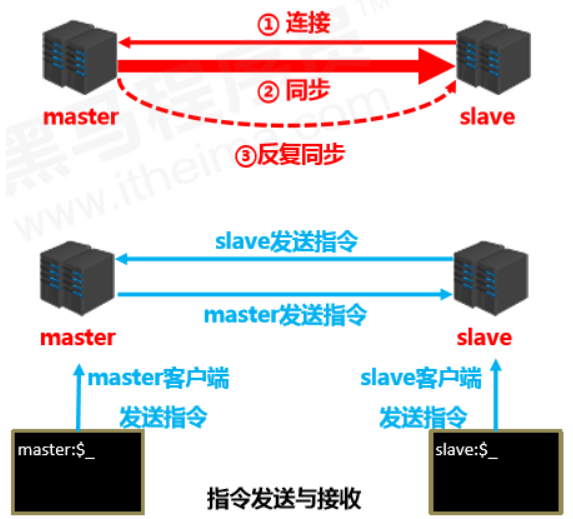
8. Master-Slave Replication
1. Overview
Multi-server connection model

- Data provider: master
- primary server, primary node, primary DB
- primary client
- Data receiver: slave
- replica server, replica node, replica DB
- replica client
- Problem to solve
- data synchronization
- Core work
- replicate master’s data to the slave
Master-slave replication
Master-slave replication means replicating data from the master to the slave in real time and effectively.
Characteristics: one master can have multiple slaves; one slave corresponds to only one master.
Responsibilities:
- master:
- write data
- when executing writes, automatically sync changed data to slaves
- read data (can be ignored)
- slave:
- read data
- write data (forbidden)
2. Purpose
- Read/write separation: master writes, slaves read, improving read/write load capacity.
- Load balancing: based on the master-slave structure plus read/write separation, slaves share the master’s load. Adjust the number of slaves as demand changes. Multiple replicas share read load, greatly improving Redis concurrency and throughput.
- Fault recovery: when the master has issues, slaves provide service for fast recovery.
- Data redundancy: hot backup of data, another redundancy method besides persistence.
- Foundation of high availability: based on replication, build Sentinel mode and clusters to achieve Redis high availability.
3. Workflow
Summary
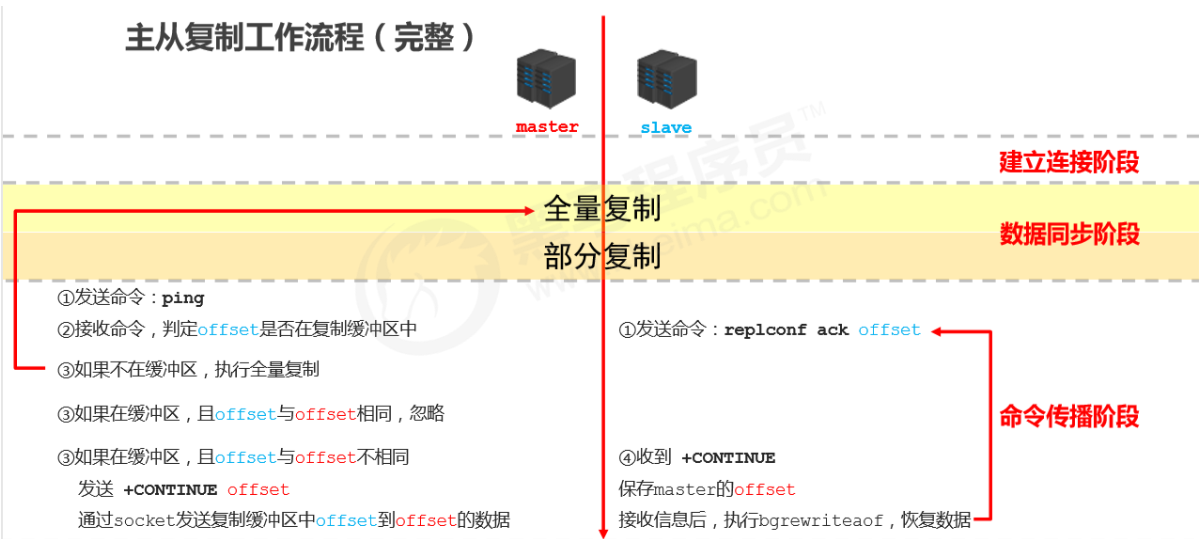
- The replication process can be roughly divided into 3 stages:
- Connection establishment stage (preparation)
- Data synchronization stage
- Command propagation stage
Stage 1: Establish connection
-
Establish the connection from slave to master so the master can recognize the slave and store the slave port.
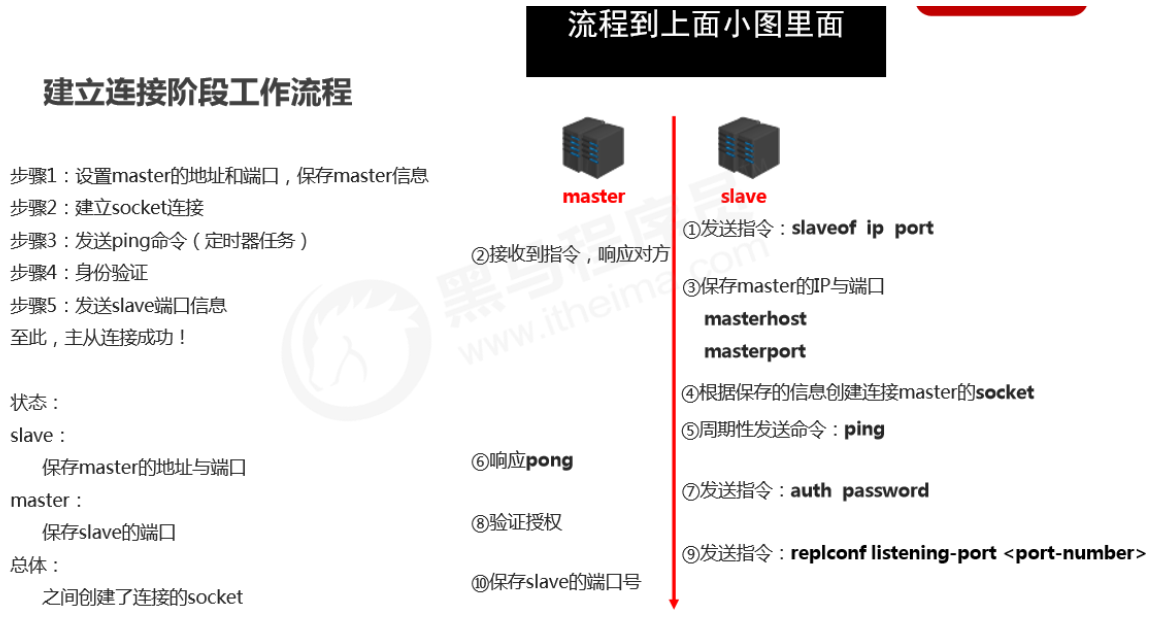
**Master-slave connection (slave connects to master) **
-
Method 1: client sends command
slaveof <masterip> <masterport>Copy -
Method 2: server startup parameter
redis-server -slaveof <masterip> <masterport>Copy -
Method 3: server configuration (common)
slaveof <masterip> <masterport>Copy
Disconnect master-slave
-
Client sends command
slaveof no oneCopy- Note: after the slave disconnects, it won’t delete existing data—it just stops receiving data from the master.
Authorized access
-
Master client sets password
requirepass <password>Copy -
Master config sets password
config set requirepass <password> config get requirepassCopy -
Slave client sets password
auth <password>Copy -
Slave config sets password
masterauth <password>Copy -
Slave startup sets password
redis-server –a <password>Copy
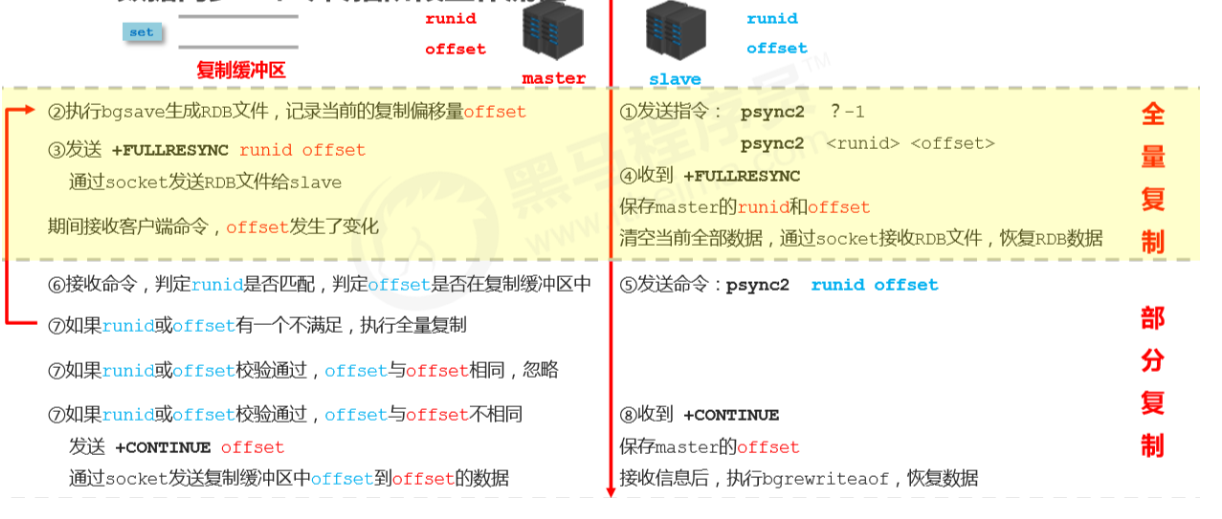
Stage 2: Data synchronization stage
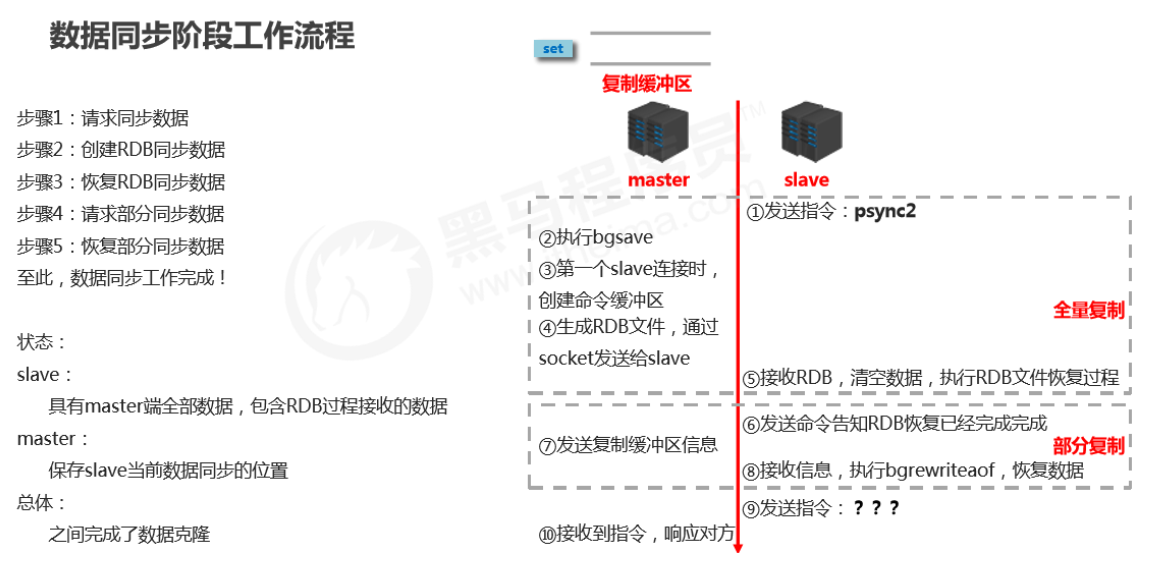
-
Full replication
- Sync all data in the master to the slave before the master executes
bgsave.
- Sync all data in the master to the slave before the master executes
-
Partial replication
(incremental replication)
- Send newly added data during the master’s
bgsaveoperation (data in the replication buffer) to the slave; the slave restores data viabgrewriteaof.
- Send newly added data during the master’s
Notes for master during data sync
- If the master dataset is huge, the data sync stage should avoid peak traffic periods to avoid master blocking and impacting normal business operations.
- If the replication backlog size is set improperly, it can cause overflow. For example, if the full replication cycle is too long, then during partial replication you may find data has already been lost, forcing a second full replication and causing the slave to fall into a dead loop.
repl-backlog-size 1mbCopy
- The master’s memory usage should not take too large a proportion of host memory. It’s recommended to use 50%–70%, leaving 30%–50% for executing
bgsaveand creating the replication buffer.
Notes for slave during data sync
- To avoid the slave being blocked or data going out of sync during full/partial replication, it’s recommended to disable external services during this period.
slave-serve-stale-data yes|noCopy
- During data sync, the information the master sends to the slave can be understood as the master acting like a client of the slave, proactively sending commands to the slave.
- If multiple slaves request data sync from the master at the same time, the number of RDB files the master sends increases, causing huge bandwidth impact. If the master bandwidth is insufficient, schedule sync based on business needs and stagger peaks appropriately.
- If there are too many slaves, consider adjusting topology from one-master-many-slaves to a tree structure. Intermediate nodes act as both master and slave. Note: with a tree structure, deeper levels mean larger sync delays between the deepest slave and the top master; data consistency becomes worse, so choose carefully.
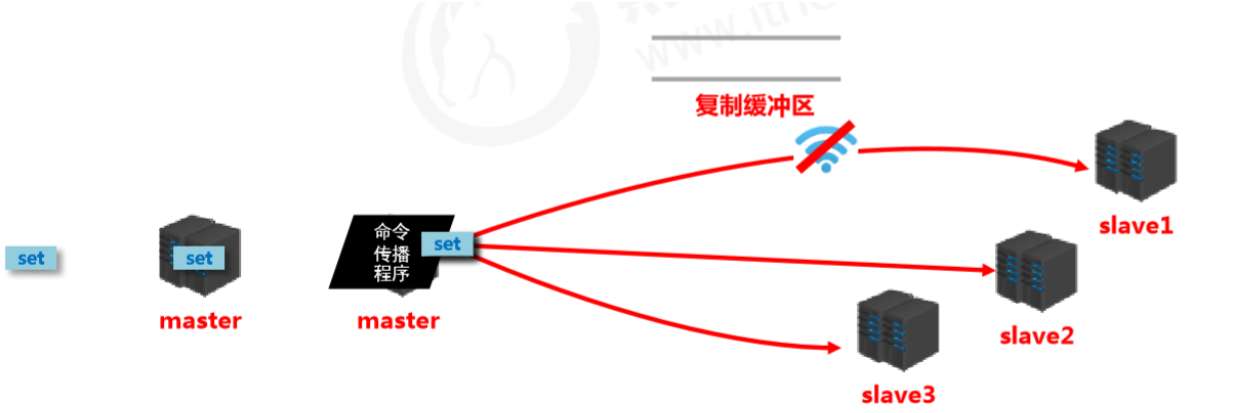
Stage 3: Command propagation stage
- When the master database state is modified, causing master and slave database states to become inconsistent, the action to bring them back to一致 is called command propagation.
-
The master sends data-changing commands to the slave; the slave executes them after receiving.
- The replication process can be roughly divided into 3 stages:
- Connection establishment stage (preparation)
- Data synchronization stage
- Command propagation stage
Partial replication in the command propagation stage
- Network interruption occurs during command propagation:
- brief disconnect/reconnect
- short network outage
- long network outage
- Three core elements of partial replication
- server run id
- master replication backlog buffer
- master/slave replication offset
Server run ID (runid)
- Concept: the server run ID is an identity token generated each time a server runs. A server can generate multiple runids across multiple runs.
- Composition: 40 characters, random hexadecimal string, e.g. - -
- fdc9ff13b9bbaab28db42b3d50f852bb5e3fcdce
- Purpose: used for transmission between servers to identify identity.
- If you want two operations to target the same server, each operation must carry the corresponding runid for identification.
- Implementation: generated automatically at server startup. When the master first connects to a slave, it sends its runid to the slave. The slave stores it. You can view the node’s runid via info Server.
Replication buffer
- Concept: the replication buffer (replication backlog buffer) is a FIFO queue used to store commands executed by the server. Each time commands are propagated, the master records the propagated commands and stores them in the replication buffer.
- Origin: when a server starts, if AOF is enabled or it is connected as a master node, it creates the replication buffer.
- Purpose: store all commands received by the master (only commands that change data, such as
set,select). - Data source: when the master receives commands from the primary client, besides executing them, it stores them in the buffer.
How the replication buffer works internally
-
Components
- offset
- byte value
-
Working principle
- Use offsets to distinguish propagation differences among slaves.
- The master records the offset of information already sent.
- The slave records the offset of information already received.
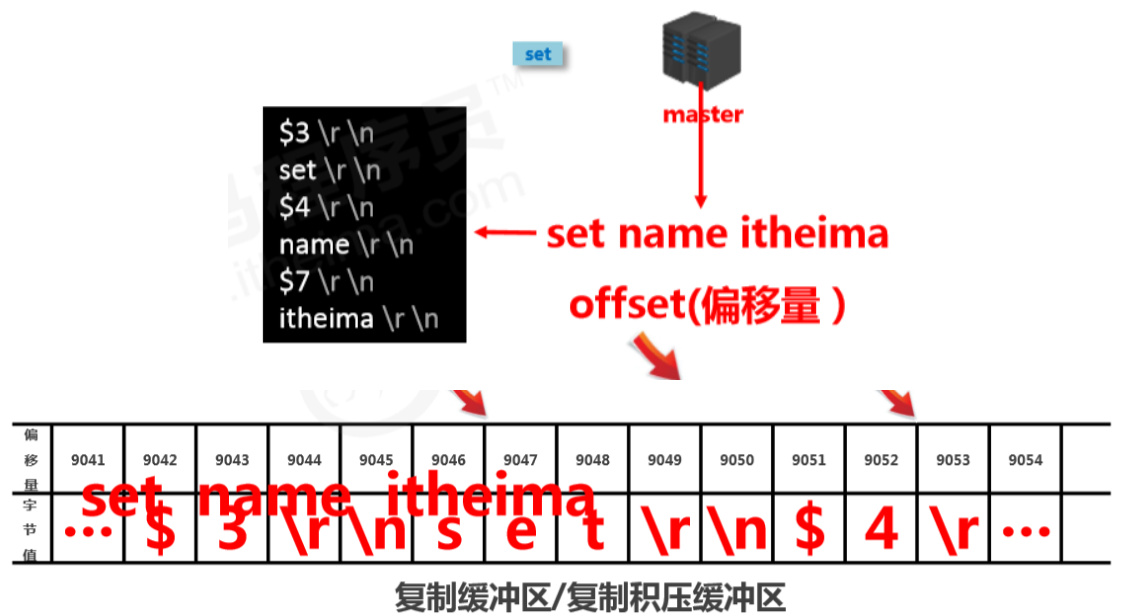
Master/slave replication offset (offset)
- Concept: a number describing the byte position of commands in the replication buffer.
- Types:
- master replication offset: records the byte position of commands sent to all slaves (multiple)
- slave replication offset: records the byte position of commands received from the master (one)
- Data source: master side: record once per send; slave side: record once per receive.
- Purpose: sync information, compare differences between master and slave, and use it for recovery after slave disconnects.
Workflow of data sync + command propagation stages
Heartbeat mechanism
- After entering the command propagation stage, master and slave need to exchange information. Heartbeats are used to maintain the connection and keep both sides online.
- Master heartbeat:
- command: PING
- interval: controlled by
repl-ping-slave-period, default 10 seconds - purpose: determine whether the slave is online
- query:
INFO replicationto get the time since the slave’s last connection;lagstaying at 0 or 1 is considered normal
- Slave heartbeat task
- command:
REPLCONF ACK {offset} - interval: 1 second
- purpose 1: report the slave’s replication offset and fetch the latest data-changing commands
- purpose 2: determine whether the master is online
- command:
Notes during heartbeat stage
-
When most slaves are offline or latency is too high, to ensure data stability, the master will refuse all sync operations.
min-slaves-to-write 2 min-slaves-max-lag 8Copy- If the number of slaves is less than 2, or all slaves have latency >= 10 seconds, force-disable master write capability and stop data sync.
- Slave count is confirmed via slaves sending REPLCONF ACK.
- Slave latency is confirmed via slaves sending REPLCONF ACK.
Full process
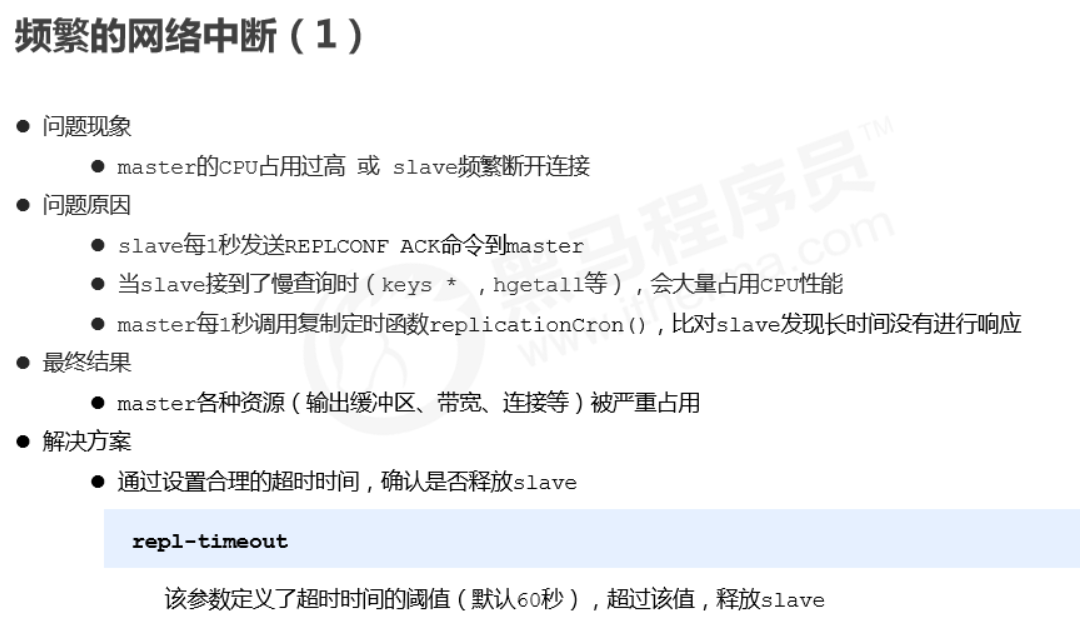
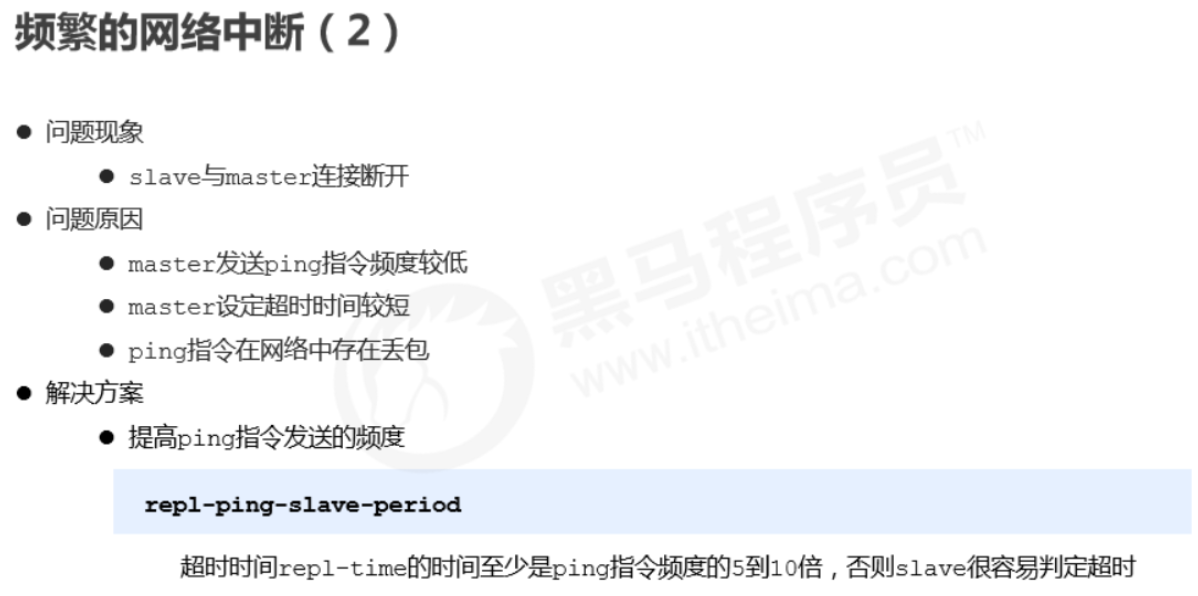
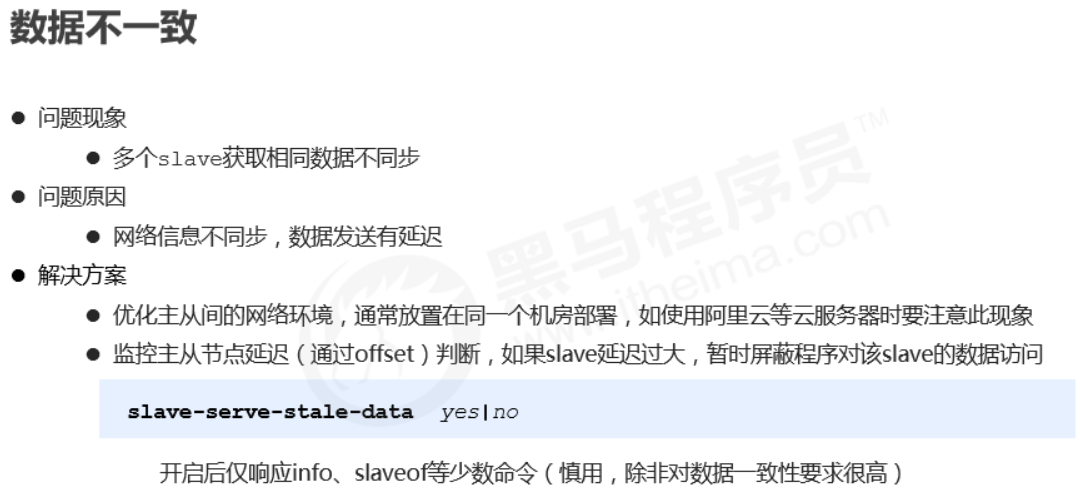
Common issues

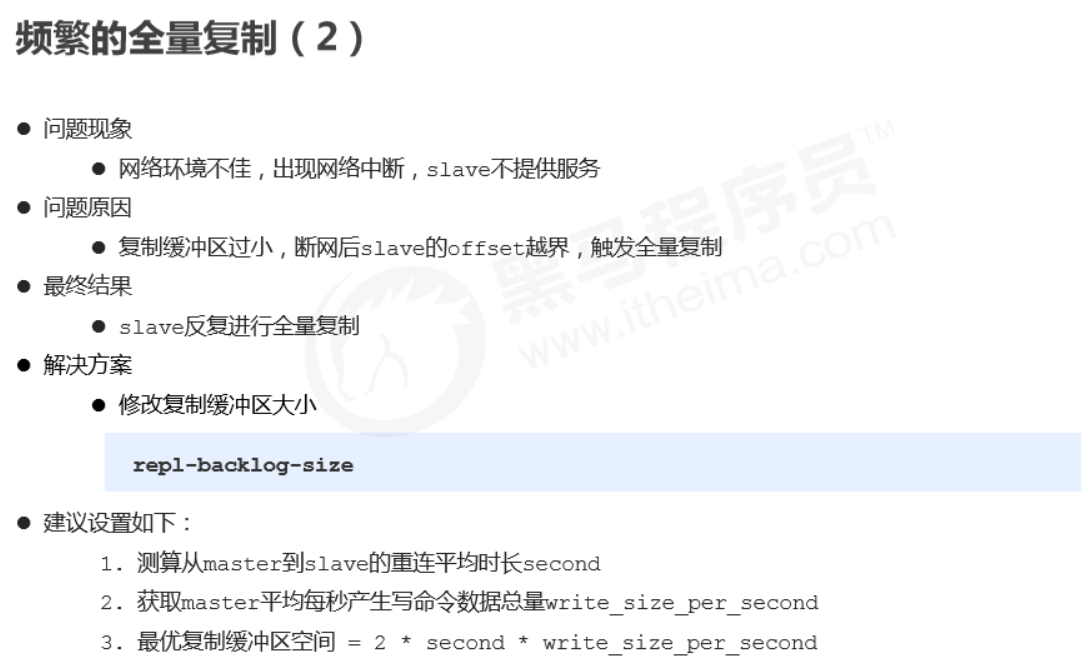
Frequent network interruptions
Data inconsistency
9. Sentinel
1. Overview
Sentinel is a distributed system used to monitor each server in a master-slave setup. When a failure occurs, it uses a voting mechanism to select a new master and connect all slaves to the new master.

2. Purpose
- Monitoring
- Continuously check whether master and slave are running normally: master liveness detection, master/slave runtime status detection.
- Notification (alerts)
- When a monitored server has issues, notify others (between sentinels, and clients).
- Automatic failover
- Disconnect master and slaves, select a slave as the new master, connect other slaves to the new master, and notify clients of the new server address.
Note: Sentinel is also a Redis server, it just doesn’t provide data services. Typically, the number of sentinels is configured as an odd number.
3. Configure Sentinel
-
Configure a one-master-two-slaves replication setup
-
Configure three sentinels (same config, different ports)
- See
sentinel.conf
- See
-
Start sentinel
redis-sentinel sentinel端口号 .confCopy

4. How it works
Monitoring stage
- Used to synchronize status information of each node
- Get the status of each sentinel (online/offline)
- Get master status
- master attributes
- runid
- role: master
- detailed info of each slave
- master attributes
- Get status of all slaves (based on slave info from master)
- slave attributes
- runid
- role: slave
- master_host、master_port
- offset
- …
- slave attributes
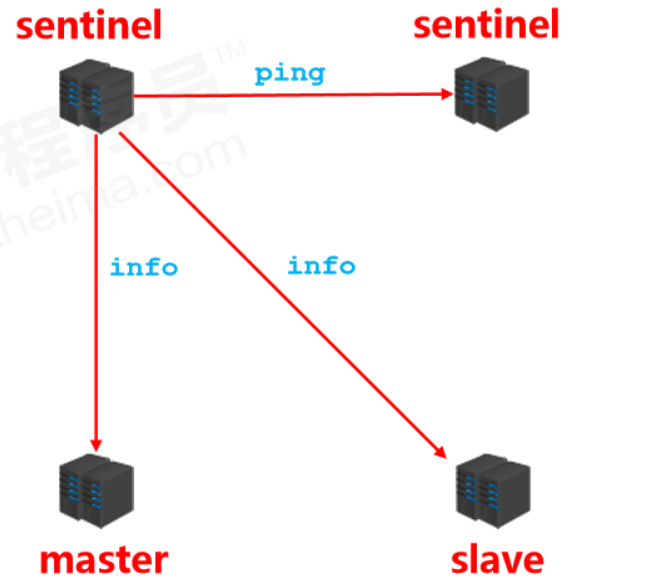
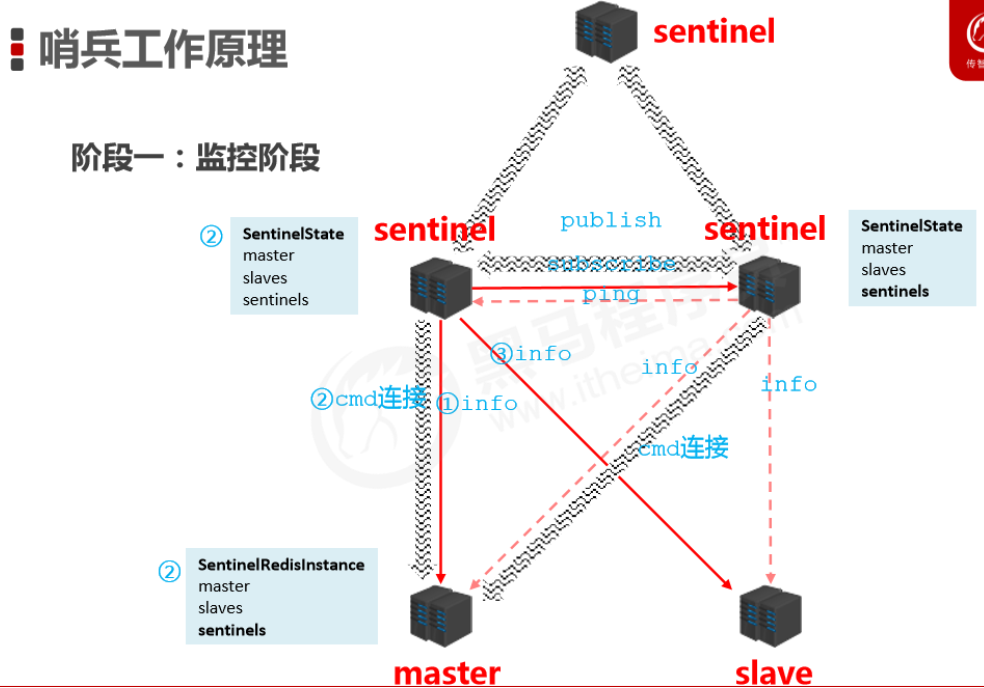
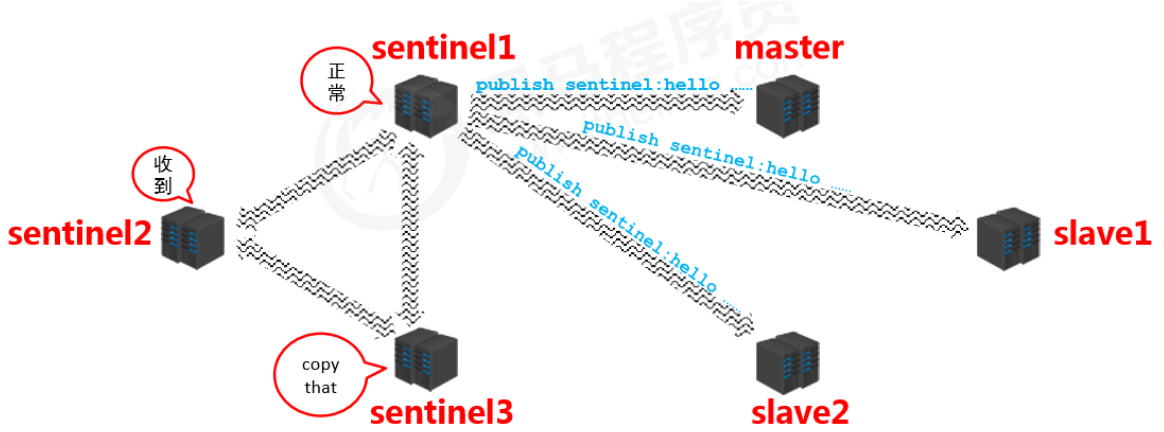
Notification stage
- Sentinels synchronize the information they get with each other (symmetric information)
Failover
Confirm master is down
- When a sentinel finds the master is down, it changes the master state in
SentinelRedistanceto SRI_S_DOWN (subjectively down) and notifies other sentinels that it found the master is down. - After other sentinels receive the message, they also try to connect to the master. If more than half (as configured) confirm the master is down, they change the master state in
SentinelRedistanceto SRI_O_DOWN (objectively down).
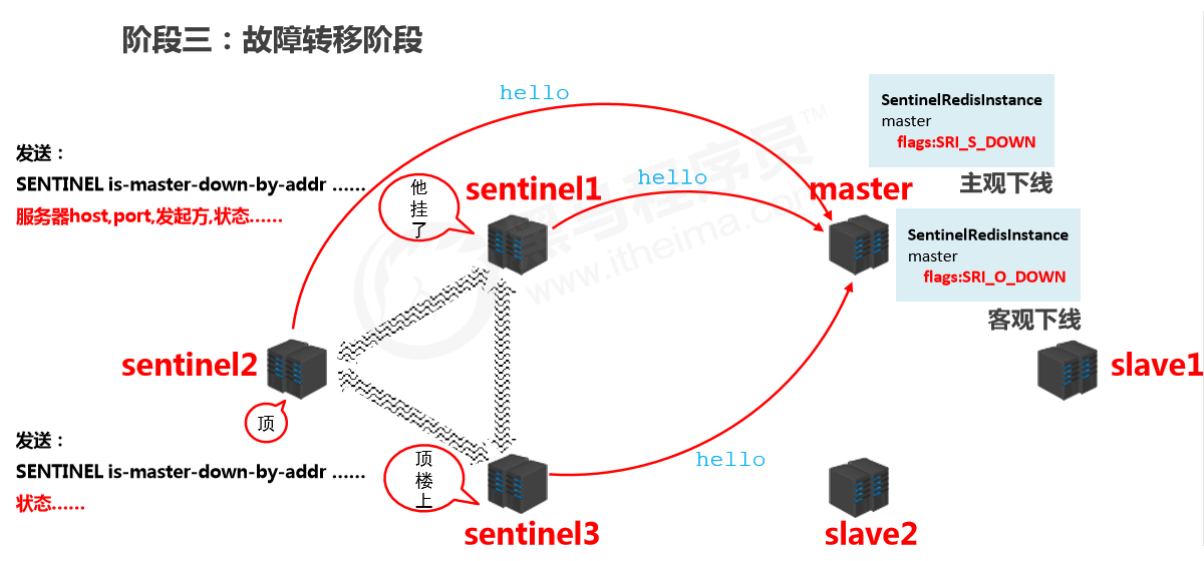
Elect a sentinel to handle it
- After confirming the master is down, a sentinel is elected to perform the failover (this sentinel decides which slave becomes the new master).
- The selection is done by sentinels sending messages to each other and voting; the one with the most votes wins.
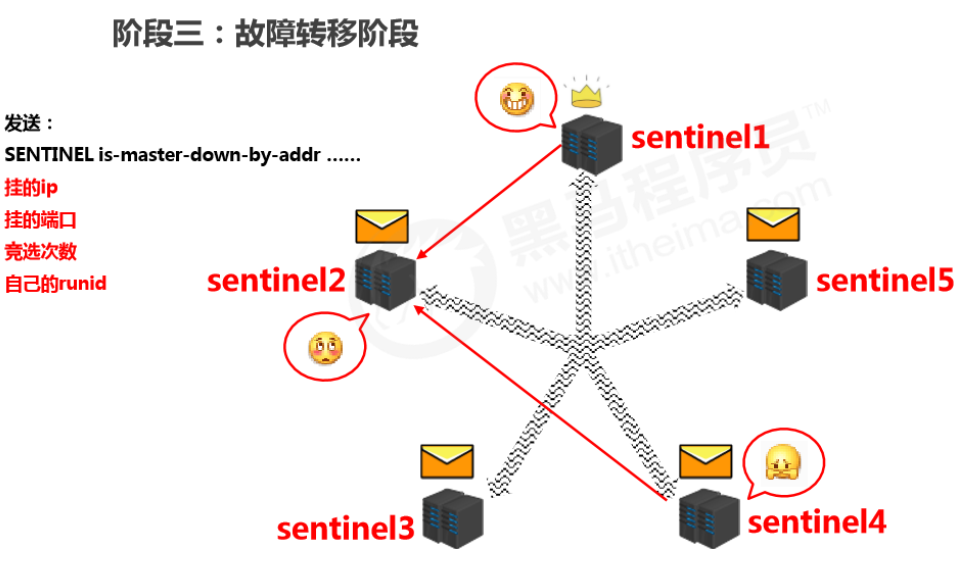
Concrete handling
- The elected sentinel filters the current slaves. Criteria include:
- pick candidate masters from the server list
- online
- slow response
- disconnected from the original master for a long time
- priority rules
- priority
- offset
- runid
- send commands ( sentinel )
- send slaveof no one to the new master (disconnect from the original master)
- send
slaveof newMasterIP portto other slaves (connect them to the new master)
10. Cluster
1. Overview
Cluster architecture
- A cluster connects multiple computers via a network and provides a unified management approach, presenting a single-machine service effect externally.
What a cluster does
- Distribute access pressure from a single server to achieve load balancing
- Distribute storage pressure from a single server to achieve scalability
- Reduce the business disaster caused by a single server going down
2. Redis cluster structure design
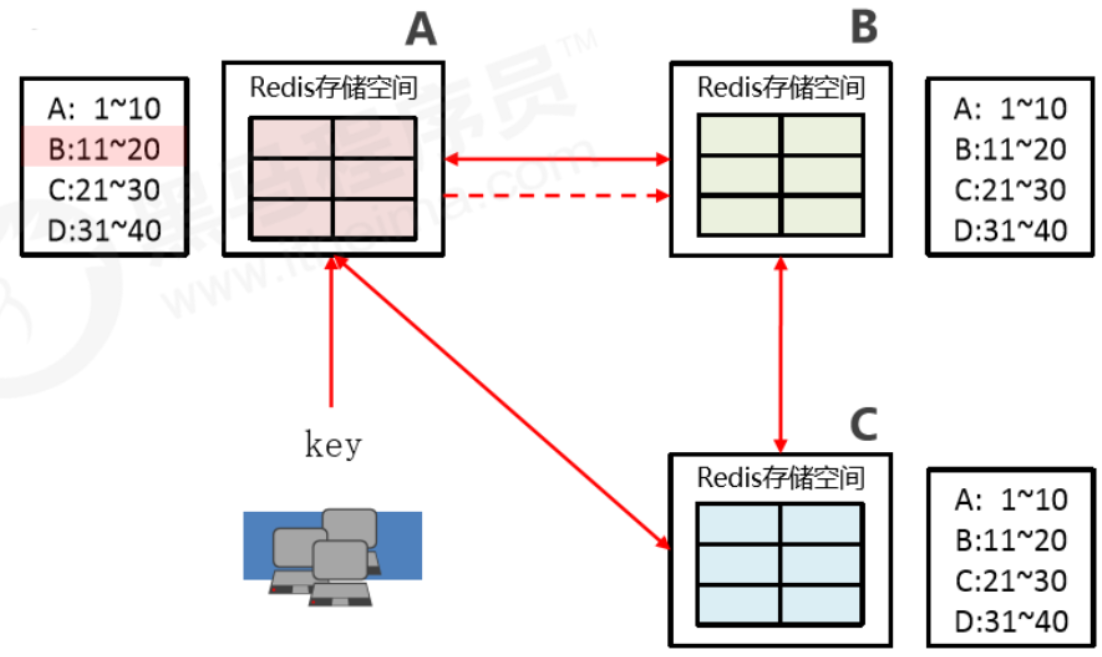
Data storage design
- Use an algorithm to calculate where a key should be stored.
- Split all storage space into 16,384 parts. Each master stores a portion. Each part represents a storage slot, not the storage space for a single key.
- Place keys into the corresponding slot based on the computed result.

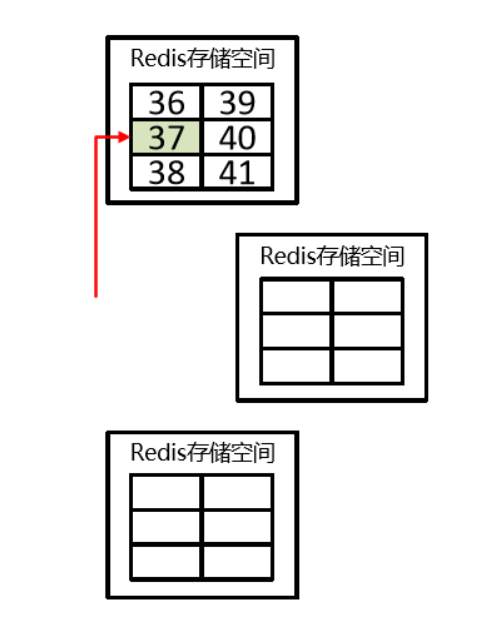
- Improve scalability — slots

Internal communication design
- Databases are interconnected and store slot number metadata for each node.
- If the request hits, return directly.
- If it misses, return the exact location, and the key then directly goes to the corresponding node to store data.
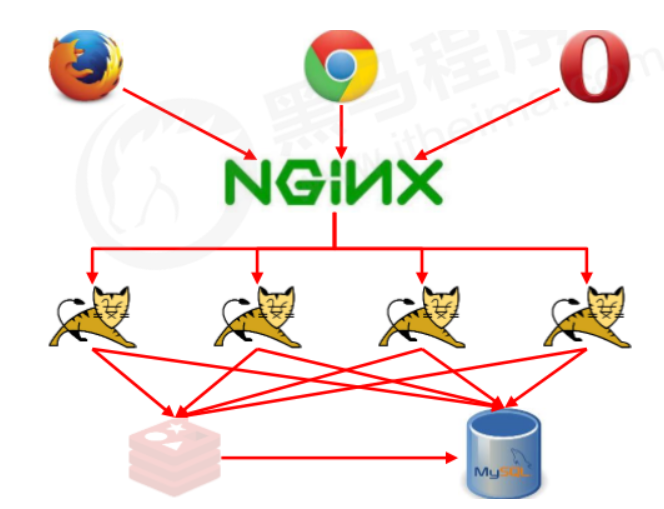
11. Enterprise Solutions
1. Cache Warm-up
Troubleshooting
- High request volume
- High data throughput between master and slave; high frequency of data sync operations
Solution
- Preparations:
- Routine statistics on data access logs; identify hot data with high access frequency
- Use the LRU eviction strategy to build a data retention queue, e.g., Storm + Kafka
- Preparation work:
- Categorize the statistical results; Redis loads higher-priority hot data first
- Use distributed multi-server parallel reads to speed up the loading process
- Warm up hot data on both master and slave
- Implementation:
- Use scripts to trigger the warm-up process on a fixed schedule
- If possible, using a CDN (Content Delivery Network) works even better
Summary
Cache warm-up means: before the system starts, preload relevant cache data directly into the cache system. This avoids the situation where user requests first hit the database and then cache the data. Users can directly query the cache data that has already been warmed up!
2. Cache Avalanche
Database server crash (1)
- During stable system operation, database connections suddenly surge
- Application servers can’t process requests in time
- Massive 408/500 error pages appear
- Clients repeatedly refresh pages to fetch data
- Database crashes
- Application servers crash
- Restarting application servers doesn’t help
- Redis server crashes
- Redis cluster crashes
- After restarting the database, it gets knocked down again by instant traffic
Troubleshooting
- Within a short time window, many keys in cache expire in a concentrated manner
- Requests access expired data during this period; Redis misses and fetches from the database
- The database receives a large number of requests simultaneously and can’t handle them in time
- Redis requests pile up and timeouts start happening
- Database traffic spikes and the database crashes
- After restart, cache still has no usable data
- Redis server resources are heavily occupied; Redis crashes
- Redis cluster collapses and disintegrates
- Application servers can’t get data responses in time; client requests keep increasing; application servers crash
- Restarting app servers, Redis, and database together still doesn’t work well
Analysis
- Within a short time range
- A large number of keys expire together
Solutions (principles)
- More static page rendering
- Build a multi-level cache architecture: Nginx cache + Redis cache + Ehcache
- Optimize severely time-consuming MySQL workloads; identify DB bottlenecks such as timeout queries, long transactions, etc.
- Disaster early-warning mechanism: monitor Redis performance metrics
- CPU usage, CPU utilization
- memory capacity
- average query response time
- thread count
- Rate limiting and degradation: sacrifice some user experience in the short term, limit some requests to reduce app server pressure, then gradually restore access after the system stabilizes
Solutions (tactics)
- Switch between LRU and LFU
- Adjust TTL strategy
- Classify and stagger TTLs based on business data validity: A 90 min, B 80 min, C 70 min
- Use fixed TTL + random value to dilute the number of keys expiring at the same time
- Use permanent keys for super-hot data
- Regular maintenance (automated + manual): analyze access volume for soon-to-expire data, decide whether to extend, and extend hot data TTLs based on access statistics
- Locking use with caution!
Summary
A cache avalanche is when a huge amount of data expires instantly, putting pressure on the database. If you can effectively avoid concentrated expirations, you can mitigate avalanches (about 40%), combined with other strategies and continuous monitoring, then quickly adjust based on runtime records.
3. Cache Breakdown
Database server crash (2)
- During stable system operation
- Database connections spike instantly
- Redis has no large-scale key expirations
- Redis memory is stable, no fluctuation
- Redis CPU is normal
- Database crashes
Troubleshooting
- In Redis, a certain key expires and has huge traffic
- Multiple requests hit Redis directly and all miss
- Redis initiates a large number of database reads for the same data in a short time
Analysis
- Single super-hot key
- Key expiration
Solutions (tactics)
-
Pre-setting
Take e-commerce as an example: each merchant selects several flagship products based on store level. During shopping festivals, increase the TTL of these keys.
Note: shopping festivals don’t only mean the day itself; traffic peaks gradually decline over the following days.
-
On-site adjustment
- Monitor traffic; extend TTL or set permanent keys for data with natural traffic spikes
-
Backend refresh
- Start scheduled tasks to refresh TTLs before peak periods to ensure data isn’t lost
-
Secondary cache
- Set different expiration times so they won’t be evicted at the same time
-
Locking: distributed locks to prevent breakdown, but note it can also become a performance bottleneck—be careful!
Summary
Cache breakdown is when a single super-hot key expires, and due to high traffic, Redis misses trigger a large number of database queries for the same data, putting pressure on the database. Strategies should focus on business data analysis and prevention, plus runtime monitoring and real-time adjustments. Since monitoring expiration of a single key is hard, combining with avalanche strategies is usually enough.
4. Cache Penetration
Malicious requests
Our database primary keys start from 0. Even if we put all database data into cache, if someone sends a malicious request with id=-1, since Redis doesn’t have this data, it will directly hit the database—this is called cache penetration.
Solutions
- Validate data legality in the program; if invalid, return directly
- Use a Bloom filter
Ending
Finally finished this 13-hour course. In the process of learning while forgetting, it was lucky I had notes to fill the gaps. It definitely stretched my learning time a lot, but it was genuinely helpful—learning isn’t “done” after finishing; it’s a process of repeated reinforcement and hands-on practice. After finishing, I feel like Redis is a bit clearer to me. Even though I haven’t had the chance to use many features, I hope in the near future I’ll have the opportunity (and the skills) to experience Redis at a deeper level.
References
All articles in this blog, unless otherwise stated, are licensed under @Oreoft . Please indicate the source when reprinting!